Friday, July 1, 2011

Safety equipment :

Safety Glasses:

Safety Glasses are the most important piece of safety equipment. There are many styles of safety glasses, but all share the same features, namely impact resistant lenses and side screens to protect against dust and debris created by power tools.

Hearing Protection:

When working with loud power tools and machinery such as routers, surface planers and joiners, it is wise to wear hearing protection. There are two common types: expandable ear plugs and ear muffs. Ear Muffs tend to provide slightly better protection, but can be very wieldy.
Consistent use of hearing protection will help protect you from long-term hearing loss.

Respirators and Face Masks:

Sanders, routers and other power tools can generate a lot of dust. When using these tools, it is a good idea to wear a dust mask, to keep these fine particles from entering your lungs. When spraying varnish or paint, a respirator is a better choice, to protect you from any harmful effects of using these chemicals.

Face Shield:

When using a lathe, you'll likely generate a lot of flying chips. In addition to using your safety glasses, a clear full-face shield is a good idea. The shield is comfortable, can be flipped up when not needed, and will keep most of the flying chips away from your face.

Proper clothing:

When working with power tools, you should always wear proper clothing. As such, you should never wear loose fitting clothing. Comfortable, long-sleeved shirts and long pants combined with good steel-toed work shoes will each provide a layer of protection. However, loose articles of clothing can easily become entangled in a power tool, which can be very dangerous.

File Managing Technique

When filing information and recording records its all way's good to keep them organised.


Tips to manage your files better

Use these tips to help with organizing your computer files.
  1. Use Documents. For many reasons, it's smart to take advantage of the Documents feature, which is called Documents. To open Documents click Start, and then click Documents to discover an easy way to store your personal documents.
    In the Documents feature is actually a virtual library. By default, the Documents library includes your My Documents or Documents folder and the Public Documents folder. You can customize the Documents library to group files and folders from any location on your computer—without actually moving them. Or you can build your own libraries to easily organize your files.
    Windows 7 libraries, with the Documents library selected

  2. Adopt consistent methods for file and folder naming. When learning how to manage files and folders, it is important that you develop a naming scheme for the kinds of files you create most often and then stick to it. To change an existing file or folder name, right-click the name in the folder structure. ClickRename, and then type the new name.
  3. Keep names short. Even though you can use long file names in Windows, you should not necessarily do so. Long file names can be harder to read.

    Folder structure in Windows 7, beginning with Documents
  4. Separate ongoing and completed work. To keep the Documents folder from becoming too unwieldy, use it only for files you're actively working on. As a result, you can reduce the number of files you need to search through and the amount of data you need to back up. Every month or so, move the files you're no longer working on to a different folder or location, such as a folder on your desktop, a special archive folder, a flash drive, an external hard disk drive, or even a CD.
  5. Store like with like. Restricting folders to a single document type makes it easier for you to find files. For example, with all of your graphics in a single folder—or in a single library—it's easy to use the slide show feature in Windows Explorer to find the right picture for your newsletter. You can also use libraries to group files together for easier searching without moving them into the same place.
  6. Avoid large folder structures. If you need to put so many subfolders in a folder that you can't see all of them at a glance, consider creating an alphabetic menu.

Word processing programe

Steps on how to open Microsoft works word processor/save:

1. Click on "Start"
2. Click "All programs"
3.  Open "Microsoft works word processor"


To save work:

1. Once finished with your work click on "file
2. Select "save as"
3. "Save in" where you would like to save your file. 
4. Enter file name.
5. Then click on "save"

Sending an email

Steps to send email:

1. Open internet.
2.  Click on the Search bar.
3. Now enter www.hotmail.com then press search.
4. Log into your account or create one.
5 Once logged in click on "New" (write new message)
6. Click "To" then enter the receivers email address eg: gtakerei@gmail.com 
7. Click "Subject" this is optional to write in short txt what the message contains.
8. Write message.
9. Final step click "send"


To receive an email:

1. Open internet.
2.  Click on the Search bar.
3. Now enter www.hotmail.com then press search.
4. Log into your account.
5. click on 'Inbox" 
6. if the mail is highlighted that means it has not been read yet. click to open.
7. Final step read it..

CV COVER LETTER

Dear Employer,


I'm a graduate from unitec's Certificate in applied technology boat building and I'm writing to apply for the job you have advertised.

I have a great passion for boat building and would really enjoy a chance in showing you the skills i have gained from a year off full time study / training, which covered all the basic boat building skills and a lot more. I have paid for my own education to prepare myself for this industry and hope you can give me that chance to prove my worth. I'm a real hard worker and have a lot off pride in my work. I work extremely well alone or with others and excel in leading tasks. Building a career in boat-building is my goal and I will do my best in perusing it.

Thank you for taken the time to read this. Please call me on the number provided if you have any questions, i will more then happy to answer them.


Yours sincerely,

A REAL DETERMINED WORKER!

GREGORY TAKEREI


ps: Here is a link to some off the work i had recorded during my boat building studys (_____Link_____)


mob: 0212108537 ph: (09) 8289757 Email: gregory828@gmail.com

Making nose cone

First step into doing the nosecone was getting the measurements off auto cad then lofted on to cardboard. After it was accurately drawn on card board the measurements were then transferred on to bits of mdf like drawn here. This will be a female jig. 

 The jig is now cut.


 The nose cone will be made out off 8mm foam so the foam is cut into 12 strips off 450mm / 13mm..
the strips of foam needed a slight bevel on each strip to minimize the gaps where they joined.
 When this is done we then glued the strips together with epoxy and nailed them to the jig one by one then left over night to dry.
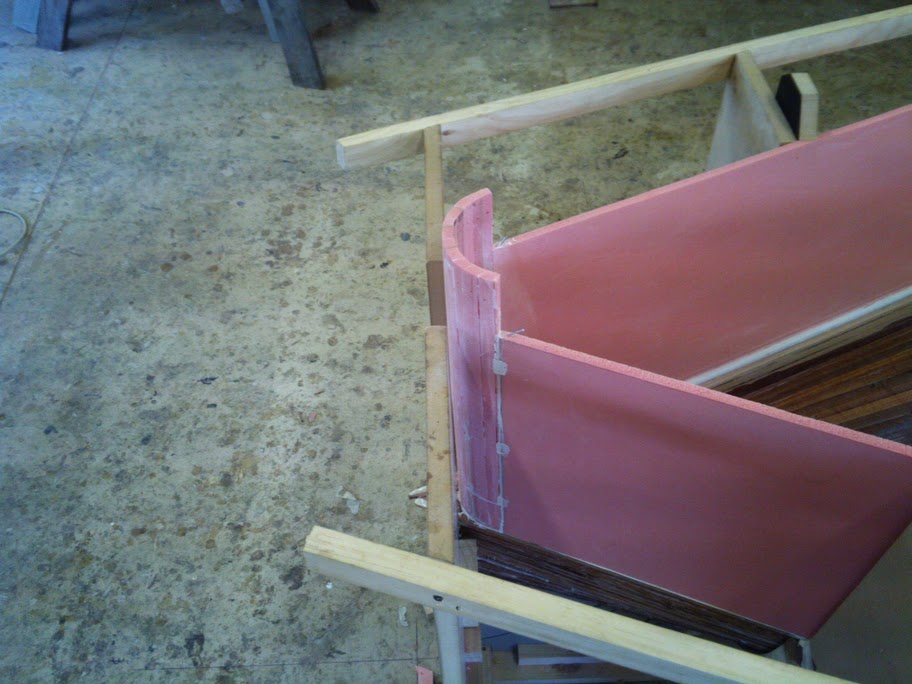
now because of lack off photos i can not show how it looked after it was glued. But what had happen'd was it was sanded slightly to get rid off and bumps or until it was fair'd it out on the outside and inside. we then installed the nose cone to the the top sides and hull with epoxy and taped / nailed to keep in place then left to dry. 

Attatching the top sides

To get the shape of the top side we used cardboard to get the ruff size we needed. We naild the card board to the frames where the topside will sit and cut the cardboard around the chine and cut about 100mm up from the sheer line.


We then placed the cardboard cut out and transferred it to the foam and cut it out. this had to be done in sections for the foam we were using was only so long. 

We then used a the ruff cut of the foam and fair'd it in at the chine to make sure that it sat flush with the hull / chine. A scribe was used to do this.  After doing so we glued the foam together where the hull joined and where the sections off the topside foam met and nailed it to the frame to make sure it didn't move then left it over night to dry.